Hi, I'm trying to develop a game in Managed DirectX with procedural textures, procedural cities and eventually full procedural planets but I'm having trouble enough as it is with doing a procedural triangle. Here's where I detail the (slow) development of the (really slow running) game.
I don't have much of an excuse for not working on this poor project and it's withering blog. Work's gotten really busy but also I've gotten interested in a few other side projects (I want to build myself a monome & I want to do these Wii hacks)... I'm hoping to bring the new stuff into this project somehow so that it doesn't call social welfare on me for neglect... and if it does I hope it doesn't walk into another door or fall down the stairs again.
A very simple change to where I left off was to introduce a bit of randomness to the L-System so that not all plants look the same. The only difference between a normal L-System and a Stochastic one is that with the stochastic one there's a certain probability of each production rule being applied. So now the plants appear in all sorts of shapes and sizes but still plant-like:
In order to show the 3D-ness of them all I arranged a few plants in a grid and tried to record a fly-about. Unfortunately it wasn't smooth at all (I've only a track-pad - I'll get a mouse soon) so I put a bit of velocity into the camera movements so that the camera keeps going whatever direction I pushed in. I tried to move about randomly in time with whatever music I had on in the background. It's hard to describe but it was really really fun - I was terrible at it and messed up so many takes spinning out of control into yellowness.
I got a couple of decent takes (relatively speaking), but when I try to compress it for youtube it turns out all jerky and crappy so I might give it another bash tomorrow and update this post.
It's been WAY too long since I updated this, I'd like to say I've been doing more important things like saving the world or something, but nope, nothing. I've spent most of my free time addicted to a game called Oblivion, it's a great game. I guess you could say I have been doing some good by saving the good citizens of Cyrodiil. Although... that's not strictly true, I murdered a good few of them. To make it seem like I wasn't just playing a game all the time let's just say I was doing research...
I'll be away from the XBox while I'm back in Ireland so I decided to pick up where I left off so I migrated the L-System stuff I had in the WPF test project over to my DirectX project. It was pretty easy, here's the fractal plant in 2D but in the DirectX app.
I then wrote a turtle-graphics class that would traverse the L-System's result and draw in 3D. The result is still pretty flat because it's just lines and a picture doesn't really do it justice, so I uploaded a video to show what it looks like:
I'm not sure what I should do next... but I think I'll have a go at making the 3D turtle graphics construct a polygon model from the L-System output instead of a line-model. It doesn't get me any closer to procedural cities but it'd be cool to have procedural trees.
I spent some spare time today doing a first draft at an L-System. I was always intrigued by how nature is apparently governed by mathematics like the Fibonacci sequence. L-Systems are basically grammars used commonly to model growth as it occurs in nature and to develop self-similar fractals. A stochastic L-System (an L-System where each possible change has a certain probability of being selected) is what was used in this procedural cities paper for SIGGRAPH 2001. There are some other methods, but I don't think they are as realistic as what Mueller and Pascal had done. The L-System (with some add-on rules) is used to draw out the streets and also to generate buildings with different LODs. I'm not sure where to go from my basic random-blocks-on-a-plane so I decided to look into L-Systems to try and generate a realistic city. But first things first, here's a fractal plant (L-Systems in WPF):
I coded a basic L-System and turtle graphics (something that draws whatever the L-System generates by following it like a path) and got the grammar for the plant on the wiki page. It looks very like something you'd find in nature, but it all follows a strict grammar with only 2 rules and if you look for it, you can see the self-similar patterns. It does take a while to execute however, especially at high iterations. This site has a few of the common L-System grammars in a java app so you can play about with different grammars/iterations etc. and here's a gallery of other simple fractal forms. Here's one more from my little app before I hit the hay - an arty close-up of part of a Koch snowflake:
I'll be honest, it's not arty, what it is is it's too fecking late to be messing about with WPF is what it is so screw you! Goodnight.
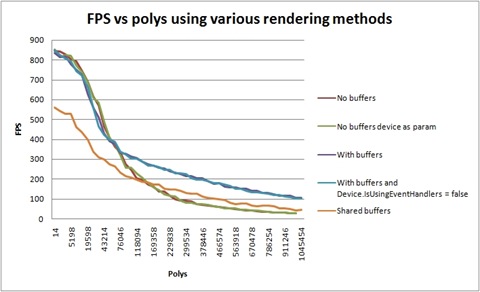
I took a bit of time out to do some performance testing, partly avoiding procedural cities as I haven't a clue how to go forward but mainly to see what could cause my planet to be so slow when rendering a pretty low amount of polys. I created a new project and ran some tests to get a benchmark, here are results for one patch getting larger as time goes on:
Sharing the one vertex buffer is pretty much worse than having no vertex buffer at all! I tried to see if 50 objects each with their own buffers vs. each sharing the one buffer would make any difference, but nope:
Weirdly enough though, 75% of all pie-charts look like pac-man:
Creating and deleting buffers on the fly for the planet just won't work as I found with earlier experiments with quadtrees. Although I did find out that the garbage collector can't clean up buffers because behind the scenes a load of events are hooked up and these all have references to the buffer. Setting Device.IsUsingEventHandlers to false can turn this off.
Sharing isn't efficient either. A bunch of buffers will have to be created on startup to be exclusively used by each patch. Working out how many and what size will be another performance analysis job... is it simple enough that I can keep procrastinating procedural cities? ... probably not.
I had a quick bash at doing a procedural city with some very basic ideas I had - it's really simple but already looks city-like. Check it out.
You can probably tell from looking at the images but all I'm doing is creating a grid of Mesh.Box(es) with random heights - biasing the height of boxes in the centre to be higher than the boxes on the outskirts. This image might show it a little more clearly.
In the next image I randomly eliminated some of the boxes (biasing the elimination more towards the edge than towards the centre). I think it looks a little more realistic.
Flying around the city really gives a better city-feeling than looking at a bunch of boxes. I tried to record a video but I couldn't get a smooth flyover using my touchpad and my *ahem* skills. It doesn't look too bad but I won't post it as I'd be worried if someone saw my flying skills they'd think I was planning another 9/11.
No, not in that way, my head still vomits while spinning all the way around when I'm near a church. I've gotten a book which has contributions from a lot of the researchers at the top of the procedural content generation field. It's called Texturing & Modeling: A Procedural Approach. It's (expensive but) friggen awesome! I was a bit worried it would be like a scientific journal -that is, just a collation of papers- but every concept is well explained and structured (and sometimes comes with a little bit of code). I'm convinced Infinity uses this book as a basis for his engine.
I've had a rethink about how go about developing this game. Instead of getting into great detail in one area then when I'm happy move on, I'm going to get something somewhat reasonable then move on. Basically I want to quickly prototype the game and see what it's like, and afterwards spend time refining and polishing it. Getting bogged down in details often led to the demise of a few of my previous projects. I think I'd like to look at generating procedural cities next.
I've decided to use del.icio.us to bookmark and organise (with tags) all my areas of research as I come across them on the internets. My personal set of bookmarks is at http://del.icio.us/jellyedwards, keep in mind I've only started to use del.icio.us and it also will contain tags for non-game-development areas of interest I have (like WPF, wiki-projects, TED, music). Incidentally, I've started another blog (nothing in it yet) for a food-based wiki-project. I've no idea if it'll work out or not, so I might post whatever other wiki/web 2.0 (hate that name) ideas I have there.
I'm really enjoying researching a bunch of random things but nothing's actually getting done so I've got to get back into it.
I've decided to take a break from the planet geometry stuff to look into procedural textures. I've already gotten a few free pre-generated textures which I used inearlierposts, but the idea of generating everything procedurally really appeals to me for some reason. My level of knowledge in this area is - like most other areas - minimal, but from doing some research I'm starting to get a feel for it. The demoscene is where most of my procedural texturing/modelling research ended up, and the demos ... are ... absolutely ... amazing... Then you find out that they (sometimes) managed to stuff all the code into an executable less than 64KB!!! Infinity is by far closest to my aspirations for this project, his work has incredible detailed planets in real time with all sorts of fancy effects. One of my favourite images from his work compares a NASA space shot to his generated planet (Dec 14th 2005).
Back to the main topic though and for procedural textures I think the guys from the produkkt have got it nailed. They have a free tool (that is, free to use the textures it generates not the actual code behind it) called werkkzeug which demonstrates their method for creating realistic textures procedurally. If you have any interest in this stuff you should definitely try out their tutorial. I've seen other examples for procedural texture generation which are cool in principle but kinda limited. I was really amazed that realistic textures like this rusty barrel can be done with a bit of Perlin noise and layering other effects. It's just the tutorial though, the gallery has more impressive textures.
So... If you checked out the links above, reading the next section where I talk about work I've accomplished is gonna kinda be like when you walk onto a intercontinental plane... First you see the first class seats and think "sweet!!" then move on to the business class and think "sure, it's not as nice as first class but it's still pretty sweet, economy can't be that bad"... Then you finally end up behind a curtain in the economy section where there are babies screaming and chickens flapping about the place and everywhere smells of sweat and cheese.
Whilst still recoiling in shock and disgust - the stewardess moves you along to where you're really seated - the cargo section. Welcome to the update of my work!
I redid my Perlin noise app in Windows Presentation Framework (WPF) - partly to start WPF and partly because I heard it was faster than the unsafe pointer-bitmap stuff I was doing before. There was a bit of a learning curve, but I'm pretty happy with the results - as an aside I'm ecstatic that WPF will be replacing ASP AJAX and javascript as that's my main job and it's more frustrating than Hugh Hefner without viagra ... playing pool with a rope. Here's the app:
My main goal was to create a tileable/wrappable Perlin noise function so that I can eventually seamlessly tile my procedural texture. I followed the example at the bottom of this article by Zucker, and it took a long time to sink in.
public float GetTileableNoise(int x, int y)
{
    return (GetNoise(x, y)*(tileWidth - x)*(tileHeight - y) +
            GetNoise(x - tileWidth, y)*(x)*(tileHeight - y) +
            GetNoise(x - tileWidth, y - tileHeight)*(x)*(y) +
            GetNoise(x, y - tileHeight)*(tileWidth - x)*(y))
        / (tileWidth * tileHeight);
}
I'm convinced this code could be a lot better:
werkkzeug seems to create a tileable Perlin noise texture instantly while this code is hella slow
there are some ugly tiling effects (cross-mirror I calls it) with certain combinations of noise
becomes
I'll carry on with noise and textures for the time being, trying to speed it up in various ways (move to hardware texture creation perhaps?) and maybe think about implementing a poor-man's werkkzeug to play with texture creation.
...to-know-the-orientation-of-themselves-to-their neighhhhbours, that's when non-uniformly-laid-out neighbours, become good-at-preventing-cracking-due-to-different-levels-of-detail-and-also good friends.
Just as in the soap, my geomipmapped planet needs to take care when linking a patch to one of it's neighbours. However, whereas the soap intended to create cracks between neighbours, my objective is the opposite. Each patch at any level of detail is set up to have 4 children: top-left, top-right, bottom-left and bottom-right; and 4 neighbours: north, south, east and kylie west. This image (which I use as a texture for debugging) should make it clearer. The text "back" at the centre is just so I know from which of the main cube faces (my sphere is really a subdivided cube) this patch comes from.
The neighbours of the main faces of the cube are set up manually at the start, but they need a way to set up the neighbours of their children when they are subdivided. The internal neighbour case is fairly trivial for when a patch subdivides:
east of the top left child is the top right child
west of the bottom right child is the bottom left child
north of the bottom left child is the top left child
south of the top right child is the bottom right child
and so on...
To get the external neighbours for its children a patch will have to look to its own neighbours, so:
east of the top right child is the top left child of the patch to the east
south of the bottom left child is the top left child of the patch to the south
and so on...
This might perhaps be more obvious in the following diagrams where the level of detail goes up by one for the patch at the back of the cube.
In the first image the top left child gets subdivided and it would set its own top right child to have the main patch's top right child's top left child as its eastern patch. Confused? Maybe this will help:
Basically, for a child to find its external neighbour (a neighbour from outside its own family) it will have to look at its parents neighbours. If a person wanted to find out their cousins, they would have to find the children of their parent's siblings.
Ok got it now? I hope so, because I went through the same confusion only to find out it doesn't always work.
If you stand at the north pole of the earth, any direction you go in will be south. This doesn't play too well with my north, south, east & west neighbour collection. These 2 videos show the problem, if you set the main cube faces so that moving east to west is ok, moving north to south will be problematic (they look upside-down compared to each other). You could fix it so north to south worked ok, but then east to west wouldn't work.
The video is a bit blurry, so here's an image highlighting the problem, it shows the where the front (A), right (B) and top (C) patches meet. Because the top patch only has one south, it clashes with the right patch (if I go north from the B then go south again, instead of ending up back at B where I started - I end up on the front patch A).
This can cause cracking because neighbours aren't actually neighbours. If the code for setting the top left's north was like this:
topLeft.north = north.bottomLeft;
For north neighbours, it would work for A to C but not for B to C. For the case of B, north of topLeft is actually north.bottomRight. B.topLeft should look at C.bottomRight when it's rendering otherwise it might try to fix a crack when it's not there or vice versa. The solution is to look at the orientation of the current patch to the north patch, for example if this patch (B) is to the east of this patch's north (C) then topLeft.north = north.bottomRight. I found it difficult to visualise what neighbours go where when I was writing the code to handle odd orientations so somewhat embarrassingly I cut out 2 bits of paper and used that to help.
Of course all of this is my own meandering implementation, there are much more elegant methods out there by people who know what they're doing (like Sean O'Neil's). There isn't even a bit of crack to be seen with these neighbours, if only that were true of the soap. Next I'll do some clean-up with the code, and look at generating the base textures from scratch.
I haven't blogged in a while, even though I've been tapping away at the code I'm afraid little progress has been made. The main function I've been concentrating on creates a triangle list for a patch with respect to cracking and also holes or partial patches created by some but not all children being drawn. I wouldn't say that I'm a neat coder but I do know when things get out of hand - I really don't know how I can make this function any simpler. Because of this, I don't have much confidence in the code being bug free. However last night it all seemed to come together:
Until I saw this bastard hole at the bottom.
The thing is there are 56 (8 choose 2) different possible index layouts taking into consideration compensating for combinations of holes and cracking. I should either (1) write an automated test for each of these combinations or (2) start over. I've decided to be lazy and go for option 3, try to fix this one and hope it's the last. But I will make a public promise here in my blog that if there's another anomaly after this one I'll write tests for each case.
Let's be honest, if that happens I'll go for option 4 and edit the blog not to have any promise of doing testing at all.
I was avoiding doing this for so long, but in the end it's a really simple solution. It's a familiar problem, quad trees are great and all but they are really slow when you're trying to render a high detail (well at least the way I implemented them). Each quad has 9 vertices and renders by drawing a fan. Previously I had given each quad its vertex and index buffer and this was a nightmare to clean up on program exit, it would just take AGES! I only found this out but it's no big hit to just share a vertex and index buffer between loads of patches just set the needed data before each render - the clean up is almost instant. So here's what a geomipmapped quad tree at level 8 looks like:
It's only about 20,000 polygons but it's rendering at only 2 FPS, so unless I include sloths in my game demographic I'll have to improve on the speed. I thought the main problem stems from the fact that I'm doing about 2,500 renders of only 8 polygons in a fan and that it would be a lot faster as a triangle strip. I tried to think of algorithmic ways of aggregating all the vertices in a quad and rendering as a triangle strip - when blood started coming out of my ears I decided there must be a simpler way. So in the end the solution was a combination of (what I call) CLOD and quad trees - basically each quad tree patch can draw way more than just the 3 x 3 vertices in a fan, let each patch draw a triangle strip of (say) 17 x 17 vertices. This way I can reduce the levels needed to render a planet in high detail. Hopefully the next images will make this obvious:
In the first image on the left I'm showing (with holes) the old way, a really low detail quad tree, and each quad patch draws a fan. With the new way shown in the image on the right, the quad tree has the same number of levels as in the previous image but each quad patch draws a 17 x 17 grid. The result is that the planet has a much higher level of detail, but the quad tree doesn't.
The trade-off is that the polys aren't culled as accurately as before but that's nothing compared to the gain in FPS (back up to 60 again) for reasonable detail. I'll need to fix holes, cracks and level of detail calculations next, all old news...
Not a very interesting post I'm afraid, all I did was optimise a bit (mainly moving all the vertices to a vertex buffer and creating one index buffer for each cube face). Now I can render the planet at a level of detail of 8 (about 750,000 polys) at a reasonable FPS of 50 - before at level 7 (about 200,000 polys) I was only getting 1 FPS!
I still have a seam problem where the 2 cube faces meet (it's most visible in the bottom right of the second image above) and I think it has to do with the fact that the base textures I have don't wrap in every direction.
I'm not looking forward to implementing CLOD on this sort of sized terrain. I've had issues with Quadtree before where it just took up a load of memory and slowed everything down. I need a good way of aggregating the vertices in the patches I render - and I'm at a loss. Also, I need to be able to dispose of patches I don't use without effecting FPS - I tried this before but with little success.
I'm not sure why I didn't think of it before, but texturing the planet isn't difficult, each face of the original cube is square so I can just apply the same texturing technique as I did before. I just have to recursively get all the noise values to a certain level of detail, normalise it and use this as a height map. The first go at this wasn't so successful.
I used parameters that would create a more asteroid-y looking planetoid just because it's easier to see where the problems are. In the above image I had set a texture coordinate wrong and this recursively led to the whole image looking really scrambled. After I got the coordinates sorted, the next problem appeared:
Basically, because I generate a height map and a texture for each patch (cube face) independently, what might have been the highest height for one patch, isn't the highest for another. So although one patch shows snow for its highest point, the neighbouring patch has higher points than that so it won't use snow for a point of the same height. I probably made that even more confusing than it actually is. Anyways, all I had to do was normalise all the patches with respect to all the other patches. The texture is starting to look like it's covering the model well - but there's a little seam to stretch over...
Now I've a textured planet! Unfortunately, I think the texture looks far too homogenous (looking the same all over) for an Earth-like planet.
However they seem like pretty good parameters for a moon or something like that, I just changed a few of the textures and got this moon.
Oh no... why did I do a full moon??? Now I've got hair growing on the backs of my hands and.... oh no... not now... I've turned into Michael J Fox in Teen Wolf!!! AWOOOOOOOOOOOOOOOOOOOOOOOOOOO!!!!!!!!!!!!!!
Geekily enough I have to say adding 3D Perlin Noise to the planet was a lot of fun - it really wasn't a lot of work to move the 2D Perlin Noise code to 3D and I quickly got some visual results. It's frustrating sometimes working with graphics to toil away and have no big change to show for it. The same goes for any programming really, fixing some memory problem can often be a lot more work than creating something visual but the visual change is an obvious and immediate reward. Here's my first application of 3D noise to the procedural sphere:
Not bad eh? It turns out a lot of geography/astronomy books have totally the wrong idea on how planets look, and it took a lot of origami to make the books mimic what my code produced. Then I thought of having to do all those folds to all those already published books to conform to my model, and I caved to making my model a little more like what the books say. Here are a few different levels of detail for the planetoid - you can see that the noise is always coherent at different levels of detail and doesn't change too much from the previous/next levels.
Here are a few attempts at a less-asteroidy-more-planety model. The main changes were increasing the frequency parameter of the Perlin Noise and decreasing the height change that the noise would realise. The last one looks most realistic, but on a proper planet, you could barely see the mountains at a distance because the height-scale is so negligent compared to the scale of the planet.
Here's a higher level of detail on the surface of the last planet, next I'll need to texture that landscape...
It was really simple to get a little procedural sphere going from a cube, just keep subdividing each face into 4 smaller faces. After thinking about it, I don't think I needed to do anything special to create a planet model because if I texture it with 3 dimensional Perlin noise even a sphere model with a lot of pinching would be fine - anyways, texturing a sphere is for another day. Here are some of my results, FPS doesn't seem to get affected until I get to a level of detail of 5 and then it all goes pear-shaped fast.... well egg-shaped as you'll see...
All bar the last run at 60 FPS (I have vsync on so we can safely assume that the actual FPS is more like 60,000,000 FPS). The last one runs about 30 FPS but this is all pure software, I haven't done anything yet to optimise. Level 6 runs about 7 FPS and level 7... What happened to level 7???
In my sheer brilliant-ness I must have implemented astrophysics while I wasn't really concentrating, this mass of matter is obviously collapsing on itself and probably would implode... and if it ran faster than 1 FPS I'm sure it would look fecking awesome, but I didn't stick around to find out.
So after optimising the sphere stuff a bit, next I'll try to create some textures with Perlin Noise. I get how it works, I'm just a little confused as to how to implement it efficiently. For 2D textures, I have an image that's stretched over the terrain and I give texture coordinates to each point so DirectX does the rest. I can visualise how a 3D Perlin Noise texture looks (like a solid cloud, any slice will create coherent texture and so would a sphere carved out of that material) - but I've no idea how to tell DX about it. I may have to go with colouring each vertex, and then stretching a detail map over it all, but that seems to me like it would look like all kinds of shittyness unless I go to a level of detail so high my planet turns into an egg.


